Before beginning the binding process, you will need access to both paper and a printer. I found suitable paper at Office Depot, but you can purchase paper at whatever store is most convenient to you. I recommend purchasing 28lb paper to ensure that there is no ink bleed on the back of each sheet. Additionally, if you are planning to bind a book, 8.5” by 11” paper should be adequate. When printing text, ensure that you are selecting “two pages per side” and “front and back printing.” While printing, select “print on short-edge” and “fit to page.”
Creating signatures or groups of sheets folded in half, typically four pages per sheet, can be difficult to order on Word documents. I recommend using a free signature generator online to ensure your pages are in the correct order for folding. For my book I used this site. Once your signatures are printed, you are ready to move on to creating the internal paper bind.

Once you have your signatures, place them in page number order. Begin with your first signature and fold down the middle, ensuring the pages are lined up. I recommend using a bone folder, but if this is not readily available, you can use a ruler or any hard, flat material. Use a ruler to ensure each signature is lined up and order them numerically when folding is complete.

Your next step is to punch holes in the signature folds for where your thread will bind the signatures together. If you use 8.5” by 11” paper you will create holes starting at ¾” and create spaces between each hole at 1 ¾”, 1”, 1 ½”, 1”,1 ¾”, and ¾”. Line up the paper with the folds of your signatures and use a hole-punching tool or a thick needle. You can find different page-length specific measurements online.

This step can have a lot of variation based on the technique that you prefer. Personally, I chose to use the French link technique and the Kettle stitch technique. To do this, you need to obtain wax thread to ensure you do not tear the pages. You can find waxed thread at any craft store, or you can obtain a block of wax to rub your thread on. I recommend using thread that matches the color of your paper for the cleanest look. Begin by tying your thread to a needle. A curved needle works best, but is not required.
Count the number of signatures you have and multiply that by about 12”, that should be the length of thread you cut for the internal binding. Separate your signatures and keep them in order. You will sew each signature together one at a time. Thread your needle through the first hole in your first signature. Sew out of the second hole and so on until the final hole. Place the next signature on top and begin sewing into the last hole of the second signature. Ensure you are leaving about 5” of thread out of the first hole and pull the thread taut. After pulling out of the second hole, thread your needle under the thread between the second and third hole and under the thread between the fourth and fifth hole in the first signature. This is known as the French link and will create an X-shape. After threading out of the last hole in the second signature, thread your needle under the previous final stitch. Before pulling through, a loop will be formed. Thread your needle through this additional loop to create a kettle stitch. These two stitches will bind the first and second signatures together. Continue this process until all of the signatures are bound together. Finish by tying a knot on both ends and cutting any remaining thread. Ensure you are pulling your thread taut after each signature is threaded. Your internal bind should end up looking like the image above.

Next, use whatever liquid glue is available to you and paint it onto the spine of the internal bind. I recommend using two layers of glue about 15 minutes apart. If you do not have a book press, you can use two heavy books and a scrap sheet of paper to avoid getting glue everywhere, or any other heavy, flat object. Leave your book overnight to ensure the glue is stiff. This is also a good time to tuck in any loose threads with a needle. Ensure the signatures are lined up before gluing. After this you may sand down the edges of your paper to create a flush look.

For this step, you will need access to a few materials. You can use any scrap cardboard available to you and will need to purchase a thick fabric, a ruler, fabric cutters, and a utility knife. Measure out the lengths of the front and back of your internal bind. I made my covers about ¾” longer than the length and width of my signatures to ensure there was overhang with the hard cover. You will also need to cut the length of the spine. I again went ¾” longer in length and width than the internal bind spine. Next, cut a piece of cardboard for the spacer. This is the soft part in between the spine and the covers. I measured mine the length of the cover/spine and about ¾” across. Place the spacer in between the cover and the spine and paint glue onto the cardboard before placing it on your fabric. Use a bone folder to push out any air bubbles. Trim your fabric so it is about an inch longer than the cover in all directions. Cut the corners of the fabric at a 45 degree angle.
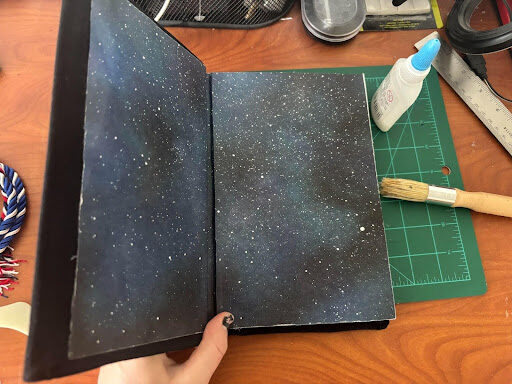
Possibly the most difficult part of this journey will be gluing your pages and the hardback. To start, purchase any mesh material and glue it onto the spine of your internal bind. This will come in handy for gluing the hardback and the paper together. If you want to create fun endpapers, ensure that you cut and glue whatever patterned or colored paper you prefer onto your internal bind before putting the internal and external bind together. Fold the remaining fabric onto the cardboard folding the top and bottom edges first. The 45 degree angle ensures that you can tuck in your fabric to create tight corners. When the glue has dried, glue the mesh onto the end papers and glue the paper to the inside of your hardback cover. This can be a messy process, so ensure you are using scrap papers to avoid getting glue on your book and using a bone folder to press out any glue bubbles. Try to align the paper with the cardboard with about ¾” overhang in each direction. You can see that I was a little off with my gluing in the image above. If you are unsatisfied with your gluing you can always tear the fabric or page off and try again. I recommend doing this early on in the gluing process to avoid ripping any paper. Once the end pages are glued to the hard covers, return to your book press and leave overnight.
After leaving overnight to dry, pull out your book and look at how your hard work pays off! This is the most exciting and rewarding step. If you see any issues with your book, you can adjust accordingly. Open your book, break the spine as necessary, and clean up any edges. If you want to customize your hardback, you can buy fabric paint or incorporate a design you would like onto a paper cover.
While book binding may not be for everyone, it is an exciting way to put your writing into a physical form. So often, as writers, we reduce our creativity to being solely digital, but nothing quite compares to being able to hold a physical copy of your hard work. This is a fun craft that can be done in about three days and allows you to show off your writing to your friends and family.
Jenica Delaney, Pine Reads Review Writer